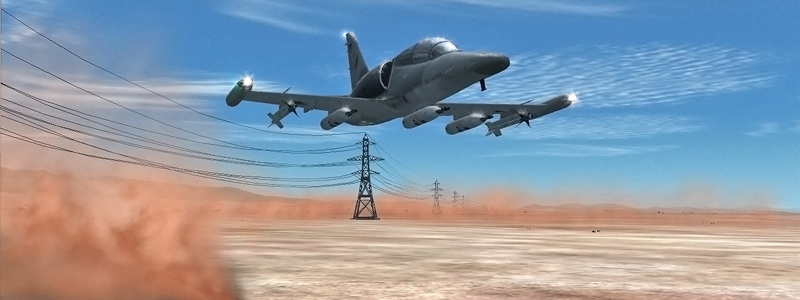
L-159A
for FS2004
by Vit Storch
Introduction:
About the L159A
"The L-159A is a single-seat light multi-role combat aircraft designed for a variety of Air-to-Air, Air-to-Ground and Reconnaissance missions. The aircraft is equipped with state-of-the-art multi-mode radar for all-weather, day and night operations and it can carry a wide range of NATO standard stores including air-to-air and air-to-ground missiles and laser guided bombs. The L-159A is in operational service with the Czech Air Force and in production." - source and more information: http://www.aero.cz/main.php?pageid=28
About the Add on: Although it might not seem so, the "A" version is quite different from my previously released "B". The "A" model uses only a few parts from its predecessor, the rest is new or reworked. Apart from necessary changes in fuselage and wing shape, there was a significant rise of polygon count in the areas where the old model looked too blocky (like the engine inlet, sides of the fuselage....). It's still not perfect but the photorealistic textures make it look great the way it is. The bigest change is in virtual cockpit where the poly count has been doubled. The avionics is now more complex, which means a short manual might come handy. Here it goes:
Quick Installation:
- Copy the L159A folder into your FS9/aircraft directory.
- Copy the content of Gauges and Effects folders into the respective folder twins in fs root directory. Replace all if asked. This will update your L-159B panel (if installed) as well.
SOUND: This aircraft comes with no sound, however if you have the previously released L-159B, the simulation will use its sound. If you do not have the L-159B, then download the Hawker Hunter soundset here: http://library.avsim.net/esearch.php?DLID=86617 or visit http://www.turbinesoundstudios.com
Notes:
- For adding your own smoke effects, first delete entry (gauge) with "alcasmoke" in the panel.cfg. Warning: this will also disable the flaps contrail effect.
SOME FLIGHT NOTES:
!!!IMPORTANT!!!- The flaps will rise automatically at the appropriate IAS (168 kts and 196 kts) and they cannot be extended beyond this airspeed. This is a feature, not a bug :-)
Cold start up :
- Plan your fuel. For cross country flying, you should load max fuel. For demonstration, 50% in center tank only will do the trick. The external tanks are not useable.
- Make sure avionics, battery, pitot heat (if necessary) is ON and parking brake set.
- Switch master Engine ON, check if apu is running, move the throttle 1/3 forward, wait for the engine to reach about 30% rpm and move the throttle back to "idle".
- Check apu OFF, engine light shows ON
- Check if canopy is sealed (canopy warning light is not on)
Take off:
- Set flaps to 1st position (20degrees)
- check if landing lights are on
- set the elevator trim to +3
- Full throttle, built up power a bit and release the brakes
- be prepared to use the rudder a lot in crosswind situation
- Lift the nose at about 140-150kts
- retract gear, retract the flaps (or let the airplane do it herself)
- begin ascend with IAS more than 250kts
Cruise:
- maximum design speed 0.81 MACH
- speed brakes can be deployed at any speed
- be prepared for downward momentum upon spoiler deployment
- for aerobatics, keep the IAS above 300kts for better roll rate
- Don't activate the autopilot less than 500ft above ground level,
- The fuel and engine systems allow safe inverted flying
- Use yaw damper near maximum speed to reduce oscillation
Landing:
- decrease the power to about 10% and slow down to 240kts using speed brakes
- extend the landing gear, check if the indicator shows "down" position
- check if landing lights are on
- slow further down to 190kts, set flaps to 1st position
- Increase the throttle, but still allow the airspeed to drop to 160kts
- Set full flaps (45degrees), increase the throttle and hold the airspeed around 150kts
- Touch down at 130kts
Shut down:
- parking brake SET
- lights OFF, avionics OFF,
- Engine Master OFF
- APU OFF
- battery OFF
Emergency Procedures :
- In case of fire: Emergency Fuel CUT, backup vacuum pump ON,
- In case of extreme emergency eject (meaning: close flight)
The Cockpit
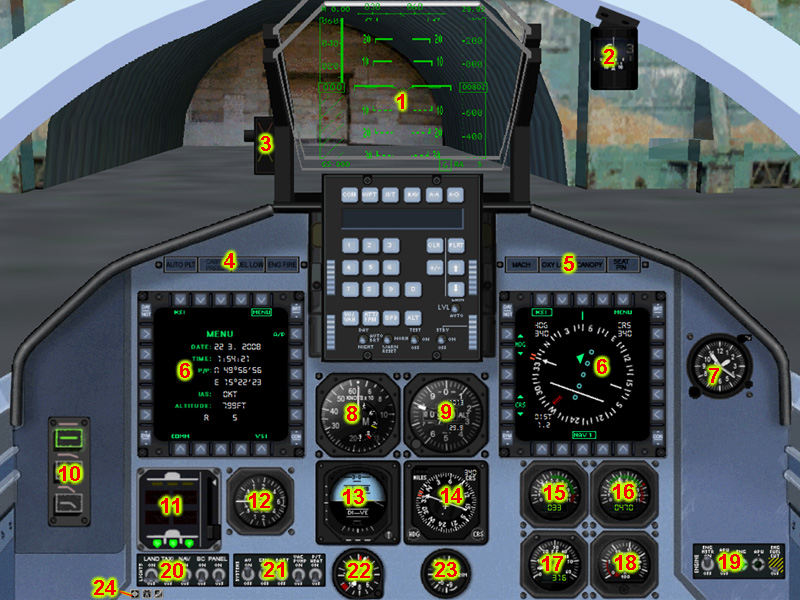
| 1 | HUD display by Eric Marciano | 9 | Altimeter [feet] | 17 | Fuel flow indicator [PPH] |
| 2 | Magnetic compass | 10 | flaps indicator & actuator | 18 | Total Fuel [lbs] |
| 3 | Angle of Attack indicator | 11 | gear actuator and indication | 19 | Engine panel |
| 4 | Warning annunciator 1 | 12 | vertical speed indicator | 20 | Lights switches |
| 5 | Warning annunciator 2 | 13 | Attitude indicator | 21 | Misc. switches |
| 6 | Left and Right MFD (a.k.a. PFD) | 14 | Horizontal Situation indicator | 22 | Accelerometer [g] |
| 7 | Clock | 15 | Engine RPM [percent] | 23 | Elevator trim indicator |
| 8 | IAS indicator [kts] | 16 | Exhaust Gas Temperature [C] | 24 | Sim icons |
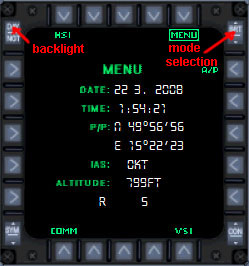
Multi-functional Display (MFD)
MENU:
shows basic flight information, global position, radio altitudemenu is accessible from any mode
There are two corner buttons that will work in any mode:
- The quick mode selection changes the modes by clicking on it repeatedly.
- The backlight button lights up the MFD buttons in 2d cockpit, which is pretty but useless :-)
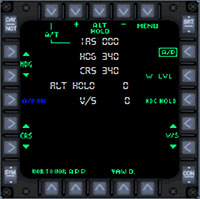
Autopilot:
Can be turned on/off either by clicking the blue A/P ON, or the respective warning annunciator. AFTER autopilot has been turned ON, you can select modes: wing level, approach, heading hold, altitude hold. The autothrottle function is accessible on another page after clicking the A/T button.
YAW damper can be used at any time, and is recommended. Otherwise noticeable oscillation may develop.
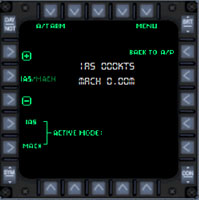
Autothrottle
The default setting is 0 kts and 0 MACH. The required ias or mach speed must be set by clicking + or - signs. By clicking the button between the signs you can choose what you are actually setting. (it doesn't affect the mode you'll be flying!!!) The autothrottle is then activated by arming (A/T arm) and clicking either IAS or MACH.
VOR to VOR
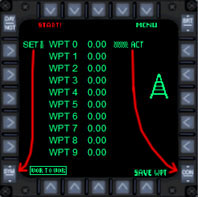
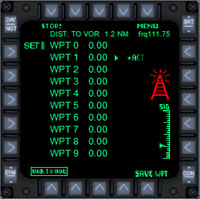
The most advanced function of L-159A for FS2004 is the vor to vor navigation. Here are a few steps you should follow to get ALCA flying VOR to VOR:
- Set NAV2 standby on the default radio stack to the frequency of the first VOR. You can easily bring it on by clicking on the "vor icon" or the radio sim icon in the lower left corner.
- Click SAVE WPT. The first waypoint will get a frequency and the "set" cursor will move one step lower. This indicates the selected waypoint for editing
- Repeat first two steps until you have set the track. You can correct mistakes and edit waypoints en-route by shifting the set cursor and repeating the first two steps.
- Click START! This will turn on the autopilot as well as start navigating the airplane to the first VOR. After reaching the first waypoint, it will head to the next one. When it reaches the last defined waypoint it will start a rather imperfect holding pattern.
- You can stop the navigation by pressing STOP! or switching off the autopilot.
Notes: by shifting ACT (active) cursor you will be able to skip a waypoint or return to the beginning. When the system is working, you will see additional information, like distance to vor and signal strength.
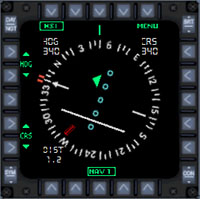
HSI- horizontal situation indikator
Choose NAV1 or NAV2 by clicking lower middle button (below the NAV1/2 icon which indicates current state!)
- HSI mode has these features:
- heading bug
- course
- glideslope
- localizer
- distance to VOR/ILS in nm
- heading/course set buttons
- marker (OM,MM,IM)
- RMI needle
- ADF indicator
Notes: Radio panel can be accessed by clicking on the sim icon bellow lights switches. RMI and ADF symbols will appear only if there is a signal.
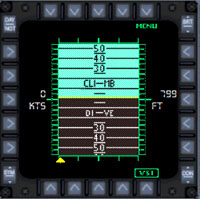
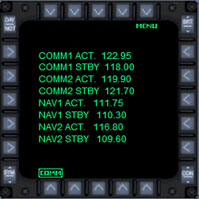
Vertical situation indicator and Communications page.
Nothing to set here. Useful info.
Other Gauges
Warning annunciators:
- AUTO PLT: lights up when A/P is ON, clickable to toggle a/p
- CABIN PRESS: lights up when the cabin pressure is too low
- FUEL LOW: indicates low level of fuel, approximately for 15 min flight.
- ENG FIRE: indicates destructive overheating in the engine area
- MACH: indicates reaching maximum airframe mach speed, spoilers will deploy
- OXY LOW: Indicates low reserves of oxygen. (not simulated)
- CANOPY: lights up when canopy is open or unlocked
- SEAT PIN: Indicates the presence of a safety pin in the handle of VS-2 ejection seat.
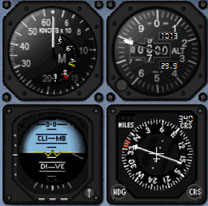
Analog backup gauges
The functions are standard, except of some reduced features. IAS indicator contains a MACH scale. The ILS needle does not work in analog HSI. Also the turn coordinator below attitude indicator has been left out
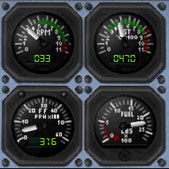
The engine gauges
These gauges are not doubled by the MFD.
RPM may climb a little over 100%, but not for too long.
EGT may never exceed 850 degrees of Celsius.
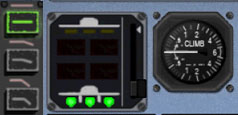
Engine control panel
From left to right: Engine master switch, APU switch, Engine running indication, APU running indicator, emergency fuel cut off.
The Switches row
Left five switches operate the aircraft's lights. The AV switch controls some of the avionics. Gen and Batt switches connect either battery or generator to the main circuits. If both are on, generator is the source of energy automatically. Backup vacuum pump must be turned on in case of an engine loss. Use pitot heat when needed.
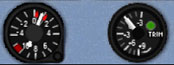
Trim and Acceleration
Acceleration gauge shows the current multiplication of a g-force. The red needles show the max and min values reached. They can be reset by the corner button.
Trim gauge shows the current elevator trim position. The green light confirms neutral position. For take off +3 is recommended, for cruise 0 and for landing +4 to +3.
The "rest" of the gauges
Is easy to use. Climb rate is a straight forward gauge. The flaps switches are clickable and show the position where the flaps should be. The gear table indicate gear position, parking brake, spoiler deployment and gear warning.
Thank you for downloading L159 and flying with us. We reserve rights to make mistakes both in this manual and in the add on. For updates and news visit DoughBree Design's homepage.
Copyright 2008 Vit Storch